How to Download and Install Wordpress Blogging Software
Another hubber, badcompany99, requested a hub about becoming an expert at using Wordpress content management platform. I am by no means an expert at using Wordpress. I have, however, been using the software for several years for several different types of blogs, including one that was very image-heavy and detail oriented. I am inclined to always make the most out of any platform I am currently using, and personally have chosen Wordpress because of its versatility.
This article is therefore the first in a series of hubs that are intended to assist you in becoming proficient in your use of this particular platform. I am very open to feedback on the series and if you have any additional questions, please feel free to e-mail me from hubpages or to post a comment here!
What You Will Need to Install Wordpress
Before I begin the tutorial for how to install Wordpress, you are going to need to have ready in order to start the process and get things rolling. I have included a capsule of links directly below. If you do not have everything that you need, please take the time to follow the links below and get yourself read to proceed!
When signing up for web hosting using the link below, using my name will get you a discount!
- You Will Need a Domain
Godaddy.com is the most popular site that I have found for registering a domain. Their prices are very competitive and their service is good as well. Your domain will be registered for one year, and you can park with Godaddy as well! - You Will Need Web Hosting
In order to install and use Wordpress, you will need to have a web host. I recommend pomirc.com, as this is the host that I use. His prices are very competitive and the service is outstanding! I have had a great experience with pomirc.com! - You Will Need Wordpress
The link above will take you to the download for the wordpress zip file. Download Wordpress and unzip it in order to install it to your web host! - You Will Need an FTP Client
I use FTP Commander as my FTP client. It isn't as easy to use as some of the available drag-and-drops, but there is a free version of the software and that alone makes it very attractive!

Preparing to Install Wordpress
One of the things that I love about Wordpress is how easy it is to install.
Your preparation consists of a series of very simple but necessary steps. For anyone who feels as though I am talking down to them, I have this to say: Everybody is new to this at some point. For those who are brand new, these steps may be discouraging if there is nobody to guide them through them. I am trying to make this tutorial as clear as possible so that everyone can get the same results!
This tutorial assumes that you already have a domain and web hosting set up.
1. Unzip your Wordpress file.
This should be fairly self-explanatory. Right click on your zip file and select a variation of "Extract All."
The Control Panel Interface
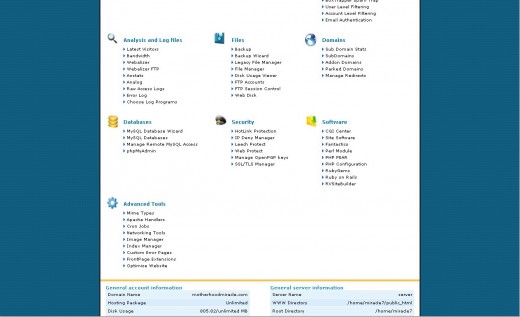
2. Log into your control panel.
In most cases, your control panel will look like the image to the right (click the thumbnail to view the detail). The layout may vary slightly depending on your host.
3. Select "My SQL Databases."
I cannot tell you exactly where on your control panel screen this will be, but you should see the bold word Databases and then beneath it, the first or second option should be "My SQL Databases." Select this option.
My SQL Databases
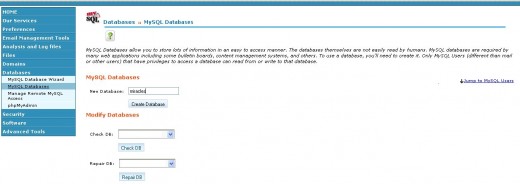
4. Create the database.
You will be creating both a database and a user for your database. Look to the image to the right (click to enlarge for detail) to see where I input my information.
This process seems more complicated and intimidating the than it is. The first time I did this I was scared out of my mind that I was going to mess something up. You won't. Just put in the name of the database. You will probably want to use "wordpress" unless you are going to have more than one blog on your server.
Database Users

5. Create the database user.
You will also need a database user. The image on the right illustrates the process.
My control panel gives me an option to autofill the password field. I always do this now after having had a hacking attempt on a forum of mine. The more unique your password is the less likely you are to find that your database has been compromised.
6. Write down your database user password!
I made this its own step because if you forget it, you're going to have to go back to the beginning and start over. Write that password down and keep it safe!
Adding a User to the Database

7. Add the user to the database.
This is fairly simple. At the bottom of your SQL page you will see two drop down menus. Select the user from the top menu and the database from the bottom menu. Click submit. This will take you to our next screen.
Privileges

8. Set user privileges.
For Wordpress to work, your database user will require all privileges. I choose the "select all" checkbox to add all privileges to my user.
At this point you are done with the databases and preparing to install Wordpress. Now comes the actual installation process. Don't worry, this part doesn't take nearly as long!
Editing the Config File
This is new to me. Because I am working with the most recent version of Wordpress, I glanced at the help documentation to make sure that I knew what I was doing. As it turns out, the developers have added another step. This is somewhat alarming and I am coming to understand why exactly my good friend badco requested this hub!
I should add that in the early days of Wordpress and other blogging platforms this was something that you always had to do every time. There was no Fantastico. In fact, the first time I tried to install Wordpress on my own after several years of doing it the "easy way" (Fantastico!), I tried to take this step and ruined my installation because of it!
The WP-Config File
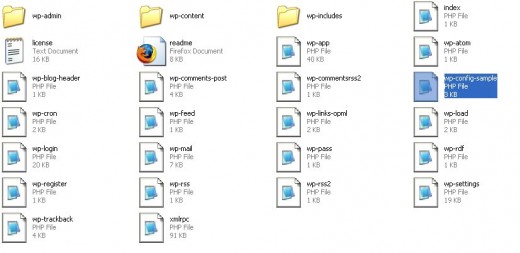
1. Open the wp-config-sample.php file.
I've provided an illustration to the right of where the document should appear within your WP folder on your hard drive. It shouldn't be difficult to find!
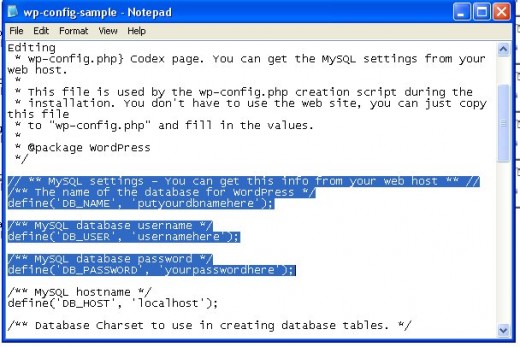
2. Find the sections you need to edit.
This is where the process becomes a bit more complicated and not as easy for beginners. You are going to need to look through the document to find the areas that you need to edit. The illustration to the right shows these areas highlighted in blue. Click the image to view the details.
3. Edit your config file and save.
Save your wp-config-sample.php file as wp-config.php. Then delete your wp-config-sample.php file. Make sure that you save the file as wp-config.php and then delete the sample file!
3. Upload everything to your server.
If you want your blog to be installed to a directory other than your main directory, just upload the entire "wordpress" folder from your unzipped download. If you wish to install to the main directory, upload everything inside the "wordpress" folder.
Installing Wordpress
This really is the easy part!
1. Navigate to your Wordpress installation.
Point your browser to the directory to which you uploaded your Wordpress files. http://yoursite.com/wordpress/
Doing this will open the installation file automatically for you.
(The above link is not a valid link!)
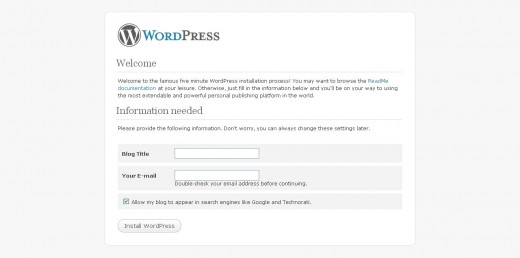
2. Fill in your details.
This is very simple: Choose a name for your blog and input your e-mail address. I always keep the checkbox ticked because I like to ping the search engines when I post a blog entry!
3. Write down your password (again).
The next page will give you your username (admin) and your password. Write down this password so that you can log in. You can change it later if you choose to do so!
You're Done! You have Installed Wordpress!
If you have gone through all of the steps above, then you have installed Wordpress on your website! Great going!
I will be continuing this series on how to use Wordpress and posting new articles here on Hubpages on a regular basis. Please continue to check this page for the links to the updated articles. I will be taking you through all of the steps that you need to use to customize Wordpress and use it effectively.
I always appreciate feedback! Please feel free to leave comments with questions or suggestions for information you would like to see in this series!


